Summary.
This article introduces SCOM tasks, and agent tasks in particular. Finds them powerful, but not yet convenient to use. And finally, introduces a solution: an open-source management pack, full of powerful tasks, but also with a user friendly UI to run them and display results.
Part One: SCOM Tasks.
SCOM is always counted as a pure monitoring tool. Or, in other words, a read-only watcher. However, it may perform on-demand actions helping admins to control and query monitored subjects. Those on-demand actions are called tasks. What tasks can do? Honestly, they can do absolutely anything. Tasks are part of a management pack, so developers can wrap any actions, they consider as useful, into tasks and ship them with their MPs. On the top of that, if another developer see more actions being useful, they can create an extension MP to add even more tasks.
Inside a task, developers can put a script (VB, JS, or PowerShell), a command line (say “sc” command, or “ping”, or anything else), or a fragment of .NET code. With such choice of tools, developers can teach SCOM to do almost any tricks.
Now, there is a question. How can I, as a SCOM operator, use these tasks, if they are so powerful. Where are they? How many tasks SCOM has “out of the box”? And where can I get more?
First, you can find available tasks in SCOM Console at the right. In the Tasks Pane. Hint: if it’s not shown, hit Ctrl+T, or from the main menu select View -> Tasks. Or expand the pane if it’s shown but folded.

Alternatively, tasks are available from the categorized menu:

You may noticed, that all tasks at the screenshots above are related to Windows-based computers. So, they won’t make much sense to a Unix-based computer. Or for a router, or event for SQL Server itself (i.e. not for SQL Server’s host computer). This is because, the task pane (and menu) are contextual. In other words, they show tasks available in the current context. And as a Windows Computer object was selected for these examples, then only tasks relate to Windows Computer was shown. Reversing this statement it can be said: SCOM Console application show only these tasks, which can be ran against currently selected object. This make sense, because there are about 5,000 tasks in the default “bare minimum” installation.
Let’s give it a try. The simplest task for Windows Computer is “IPConfig”. This task just runs the “ipconfig” command and present its results back. Very convenient, and no need to log in to a server to run this very simple command. Step one, click at the command in the Tasks Plane. Step two, configure command (this one has not parameters). Step three, run the task. And finally, step 4, observe results.
Note, you can run a single task against multiple targets.

And voilà! Command’s output:

To make it more impressive, consider that:
- These are agent tasks, so they run in the context of SCOM Agent.
- They run locally at the target where SCOM Agent is installed.
- You don’t need inbound connection to start the task. The same reporting channel, which SCOM Agents uses to report health state, is used. And this channel is encrypted and highly secured, and initiated by agent.
- You don’t need credentials at the target server, however, may use a specific run-as account if required.
Looks cool, eh? So, give me more. Browsing through the current list, other useful tasks might be found like “List Server Statistics” — easy way to find current uptime; “Route Print” — to check IP route configuration; etc. But wait, a computer has disks (at least one), network adapter(s), OS installed, or, perhaps, some applications like IIS. Where are tasks for them? That’s the catch. Remember, that tasks are shown for the currently selected object. So, this object is currently “Computer”, not “Disk”. Once again, this make sense, because otherwise, how SCOM knows what disk (if multiple) it has to run a task against? But at the other hand — how computer components, like disks, can be seen? There is no such view in the console.
There is an extremely useful, but not-yet-well-known dashboard, to show all contained object. It’s called “Object State Dashboard”.

So, when opened, the dashboard shows all contained objects, including as expected disks. And no surprise, when a disk is selected, the same Tasks Pane now shows disk related tasks.

This is pretty cool, but… I would say it’s “not-yet-obvious”, even if not counterintuitive. So, this is one of the reasons paying to low popularity of SCOM tasks. Another reason for tasks not being very popular, despite they are very powerful, is their parameters. Not all tasks are that simple that they don’t have any parameters. Some require thoughtful thinking before they can be started. For example, an agent maintenance task, called “Get The Pool Member Monitoring a Top Level Instance” require pool id and managed entity id to run. What are they? Where to get them? Tasks description doesn’t help much as it’s empty.

This was the second reason for tasks low popularity. And the final one, I think is results display. A task result can be shown as a text, as XML or HTML display, and can be copied to clipboard. That’s pretty much it. It cannot be displayed as a table (unless output HTML is not pre-formatted as a table), it cannot be used as a parameter to run consequential tasks, cannot be filtered or searched (unless you copy it to an editor), etc. In other words, tasks are hard to find, and their UI is too much simplistic to make them a popular tool.
So, is there a way to leverage SCOM Agent tasks to easy day-to-day admin and maintenance duties, but also make them easy to run and use?
Part Two: Maximus Control Center management pack.
Thinking on the question asked in the end of the part one, I came to an idea to create a bunch of tasks to perform day-to-day admin job. However, I understood, that just making these tasks will not easy anyone’s job. Simply because running all these tasks through the standard UI will be terrible experience. So, it won’t make anyone’s life easier. So, an obvious solution to that was to make a wrapping UI, which knows these specific tasks and can run them with appropriate parameters and targets, as well as displaying tasks result in a familiar and easy-to-read way.
So said, so made! After hours of programming, I’m happy to present Maximus Control Center management pack, which can do. In the initial release, I implemented Service Control, Event Viewer, and Registry Editor. Let’s see how it looks like. The below screenshot has Service Control module:

So now, it’s easy as 1-2-3-4-5 to control services at a remote computer via SCOM console without remotely logging to it. Do the following:
- Select “Computer Control Center” node in the navigation pane.
- Select a computer you wish to control.
- Select “Services” tab and click the “Load / Refresh” button.
- Select a particular service you wish to control and double-click or press Enter.
- Use a familiar interface mimicking the standard Services application UI to control and configure the selected service.
Comparing to other remote control tools:
- You don’t need inbound connection to the controlled computer, so it can be anywhere, including public clouds, or your home office.
- You don’t need any credentials to the controlled computer, but your SCOM role must include the controlled computer in the role scope, and allow you to run all required tasks.
- All the actions are recorded in the native SCOM Task audit journal by default.
Other control tabs for Event Viewer and Registry Editor look like the below:
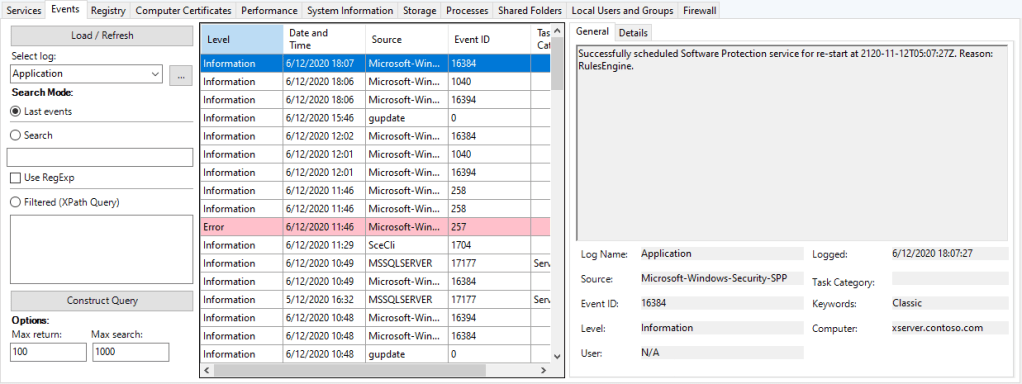

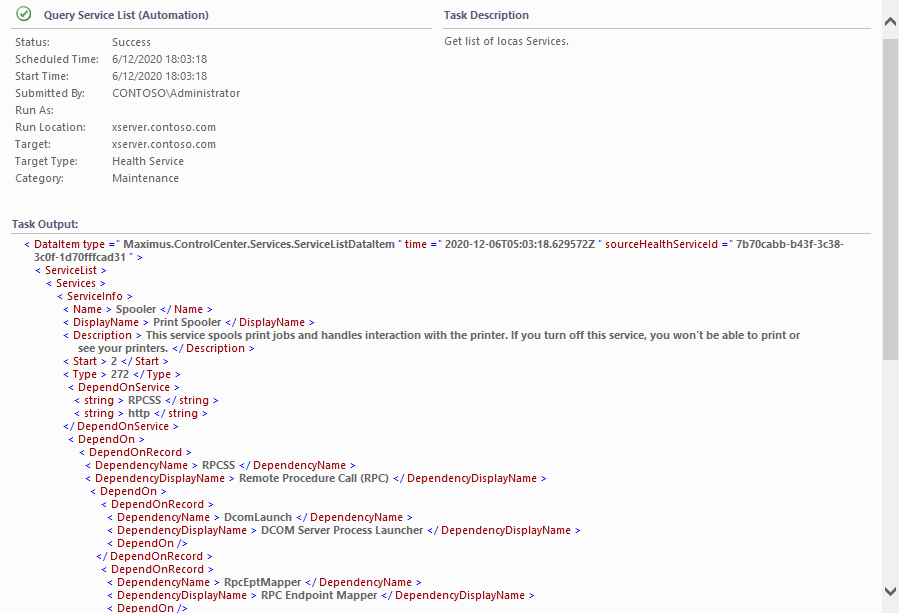
So, what is under the hood, and how the magic is done? In fact, it’s quite simple (to say). As you may know, absolutely everything in SCOM Console is from management packs. The Maximus Control Center MP consists of three components. The MP XML itself, one DLL implementing various tasks, and another DLL implementing a custom control. That custom control is exactly what you can see at the screenshots above. And this user control knows about all the tasks defined in the MP and implemented in the first DLL. As a result, when you click at a registry key in the Registry Editor tab, the “Read Registry Key Task (Automation)” task is started in the background, and the task is supplied with the correct parameter (i.e. registry path, in this case HKLM:\SOFTWARE\Microsoft\ASP.NET). Later, when the task brings its results back, the results (which are custom XML) are presented in a shape of familiar interface, which is mimicking the standard Registry Editor. This is how the raw results look like (from the Task Status / Audit) view:

To give you more flavor, the below are outputs from the “Read Event Log Task (Automation)” and “Query Service List (Automation)”. You can compare how the raw XML looks like (not exactly human friendly) versus control tabs view, which is way more structured and more human readable.

If you like the idea and how it works, you’re more than welcome to test Maximus Control Center management pack in your environment and adopt it for your day-to-day tasks. First, you need to install the base MP from the following GitHub repository: https://github.com/MaxxVolk/Maximus.Base.Library. Simply download the latest release and import it to your SCOM Management Group. This MP contains base .NET classes to implement SCOM managed workflows and SCOM Console UI Extensions. I’m planning to write more articles for SCOM developers about the base MP and how they can use it in their projects.
Next, you need to install the actual Maximus Control Center MP from another GitHub repository: https://github.com/MaxxVolk/Maximus.ControlCenter. Same, simply download and install the latest release. After importing the MP and after the MP is propagated to all management servers, your SCOM Console application will automatically load the control assembly and show a new node in the navigation pane. That’s it!
If you like it and want more functionality, please join me at GitHub!
WARNING!
This MP was not widely tested, so please do not install straight into your production system. Both DLLs (tasks and UI) are compiled for .NET 4.8.
Tasks should not affect any SCOM Agents unless you start them (either from the custom or native UI). But the UI DLL may affect your SCOM Console application stability or, in the worst case, may cause SCOM Console crash at start. In this case, remove the MP using PowerShell and clear console cache:
Get-SCOMManagementPack -Name Maximus.ControlCenter | Remove-SCOMManagementPack
Then at each computer where SCOM Console doesn’t start, for each user delete all files from these folders:
C:\Users\{User Name}\AppData\Local\Microsoft\Microsoft.EnterpriseManagement.Monitoring.Console

C:\Users\{User Name}\AppData\Local\Microsoft\System Center Service Manager 2010
Happy testing and if you have any feedback, just write a comment to this article.

Afternoon, how do you import it? SCOM does not recognize the .mpx format?
LikeLike
Hi Tony, you need to build the solution (using Visual Studio or MSBuild, both with VSAE extension). That will make MPB file, which SCOM can import.
LikeLike