Part 1.
An extended transcript of my session @ SCOMathon 2021.
Links for this article:
- SCOMathon 2021: https://scomathon.com/scomathon-2021-1
- SCOMathone @ LinkedIn: https://www.linkedin.com/company/scomathon/
- SquaredUp: https://squaredup.com/
- GitHub repository for the demo project in this article: https://github.com/MaxxVolk/SCOMathon.UIExtension.Demo
- GitHub repository with a base library to simplify development of managed modules and Console UI extensions: https://github.com/MaxxVolk/Maximus.Base.Library
- Tools:
- Visual Studio (any edition): https://visualstudio.microsoft.com/
- System Center Visual Studio Authoring Extensions: https://www.microsoft.com/en-nz/download/details.aspx?id=30169
In this article I’m going to give a short overview of SCOM Console architecture, and give you few reasons why anyone would need to develop new UI to extend the Console with two quick examples from my open-source management packs. Then the plan is to give you some jump starts to-dos, and then we will move to three practical examples.
Why Extending SCOM Console UI?
So, why any new UI might be required in SCOM console? Well, during my career at CCL, I created several management packs for people from different teams, such as virtualization, storage, or digital experience. They all are great specialists in their areas and indeed very clever people. However, I noticed, that most of them were struggling to use SCOM console at least at the beginning. So, I realized for myself, as a monitoring solution developer, that if I want people use my solution and get value out of them, I have to create not just a good monitoring MP, but also must make it easy and intuitive to use and to configure.
I also remember myself about 10 years ago, when I installed SCOM for the very first time. I opened the console, the had been staring into it for about 10 minutes, then closed it.
To illustrate a such an inconvenience for a new user, let’s take an example. A typical management pack for an unhosted subject such as network device, URL, external mail server, etc. Anything you cannot really discover automatically. Usual approach is to make root discovery read device information from a file. What does this mean from practical perspective? What steps a new user of your product has to do?
Install the management pack.
Look for changes in the console. Lookup for any “add” button. Lookup for a wizard in the Administration section.
Sigh. Go to read the documentation. Realize need to create a file and make an override to a discovery.
Creating file is easy if have one management server. But if multiple, need to use a network location or multiples copies (probably out of sync at some stage). If using network, then permissions might be an issue.
Find the discovery to override. How was it called? “Some discovery”? Or “Discover another subject”?
Etc. Too many troubles, right?
All that means, that people will be less willing to use your product. So, bottom line: make your management pack setup and configuration easy and intuitive. At least, put some simple instructions in a splash screen in your monitoring folder.
So, let’s have a look at some practical reasons for developing Console UI:
- Insert object instances when automatic discovery is not possible.
- Present agent task results in user friendly interactive form.
- Create/edit/delete overrides for key management pack workflows.
- Edit rule/monitor configuration with complex syntax: lists, expressions, etc.
- Present objects/properties/monitoring/tasks results from your management pack in custom display.
- Add more contextual tasks and alert actions.
The top reason, as just mentioned above, is discovery of monitoring targets.
The second reason is for agent tasks. Agent tasks is extremely powerful tool. Each agent task is a piece of code, which accepts some inputs, run at a specific agent locally, and deliver results back. And you can initiate its start from SCOM Console or from SDK API. But how many people use these tasks? I bet not many. First, because they hard to locate. Say, a task to return current disk usage (yes you also can bring up real-time performance view) is bound to the logical disk target class. Which means you need to pick up an instance of logical disk. Or in other words, locate this object in SCOM Console. There are multiple ways of doing that, but they require some dipper knowledge, and none of them is shorter than 5 clicks. Therefore, making special UI to run these task and formatting returned results should help people make more value out of SCOM.
The third and fourth reasons are for fine tuning of your MP. Having a custom UI will help users to locate hidden gems and tailor their experience easy and intuitive (i.e. without reading documentation).
The fifth reason will be shown in an example below.
And the last reason allows you to add windows like Health Explorer or Alert tasks.
Examples.
Example #1: Format Agent Task results.
The first example is about an agent task. In my ControlCenter open-source MP (https://github.com/MaxxVolk/Maximus.ControlCenter), I created an agent task to query Windows Service status. But on the top of that, I also created a UI to display results. When you run a task, it returns a custom data item XML like:

That data is fairly readable, but some values encoded with enumerations or flags (like type and start). And it doesn’t look “nice” in general. So, for better task result presentation, I created a Console extension, which mimicking the familiar interface of the Windows Services console. But work in SCOM Console and leveraging Agent Tasks to run remote queries. The below is an image, showing the same XML, but parsed into a form.

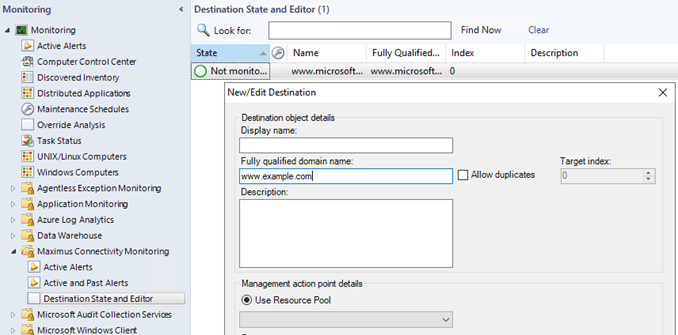
Example #2: Insert custom object.
The second example is about creating new objects in SCOM. Again, I’m using my another open-source MP. This time it’s Connectivity Monitoring MP (https://github.com/MaxxVolk/Maximus.Connectivity.Monitoring). This custom UI allows to add a new network destination address for monitoring. Instead of urging user to create a file, let them enter all details interactively.
Well! Where is to start?!
If at this point I haven’t convinced you that SCOM UI extensions are useful and worth learning how to develop them, you’re welcome to drop further reading. Because the practical part begins. If otherwise, you’re keen to proceed, then let’s start with your first SCOM UI “Hello World” application.
But wait! There are some important notes!
(You don’t need to read this section right now, so you may skip to “Demo #1” below and return here later.)
Before I introduce you the actual first demo, there are few notes to make. First of all, be aware, that some things I’ll be showing in examples are kind of ritual, and I don’t always know why this is done that way. Most of knowledge here is NOT from any documentation, but from reverse engineering. Secondly, don’t afraid if this and the next note doesn’t make any sense for you so far. I put them here, in the very beginning, to save you dozens of hours of debugging crashing apps. Just treat them as a kind of commandments so far.
- Do not use WPF (Windows Presentation Framework). Like you or not, but SCOM Console is a WinForms application. Therefore, for seamless integration you have to use the same technology.
- NEVER EVER create your own connection to SCOM Management Group. Using last connected management server from Windows Registry and establishing your own connection to management group has HUGE drawbacks:
- Users can run multiple SCOM consoles connected to different management groups. Connecting to last used MG from registry you may connect user to wrong MG, say the console is connected to test MG, but your component connects to production MG – consequences might be catastrophic.
- Users can run console from non-trusted environment entering their credentials at the console startup. If so, your attempt to connect using current user will fail.
- Memory usage: each connection requires about 100 MB of RAM.
- Use strong named assemblies for better version control. Using strong named assemblies will ensure that SCOM Console will reload your extension on fly when version is increased. Otherwise, you have to restart the Console application and may need to clear console cache to get newer version.
- Always inherit your base component from MomViewBase (or its descendants). Inheriting your root components from MomViewBase you get few helper methods, but the main advantage is shared management group connection to use (see the previous note).
- Use the palette from the BrandedColors static class to make your component look organic. This is just a simple decoration, but it will make your extensions look naturally.
- When creating a class library .Net assembly with your extension, you’ll need to reference some Microsoft libraries. So, there are some must and must-nots.
- You MUST reference the following assemblies in your project:
Microsoft.EnterpriseManagement.UI.ConsoleFrameworkMicrosoft.EnterpriseManagement.UI.ViewFrameworkMicrosoft.MOM.UI.CommonMicrosoft.EnterpriseManagement.UI.FoundationMicrosoft.EnterpriseManagement.UI.Console.Common - On the top of this list you MAY reference SDK assemblies:
Microsoft.EnterpriseManagement.Core
Microsoft.EnterpriseManagement.OperationsManager
Microsoft.EnterpriseManagement.Runtime - You also MAY reference more bre-built components:
Microsoft.EnterpriseManagement.UI.Controls
Microsoft.MOM.UI.Components - But under any circumstances you MUST NOT reference SCOM Agent (aka Health Service) assemblies (please remember this: at some stage you will feel a temptation to link them):
Microsoft.EnterpriseManagement.HealthService
Microsoft.EnterpriseManagement.Modules.DataTypes
Microsoft.Mom.Modules.DataTypes
<Any other Health Service related libraries>
- You MUST reference the following assemblies in your project:
Demo #1: Hello World!
(Not yet)
To get on the mission we need some tools. Download and install Visual Studio (2017 or 2019). Any edition will work. If you develop non-commercual open source project, then you can use the free version of Visual Studio (always read the license agreement and seek for a legal advice if unsure). After installing VS, you need to download and install System Center Visual Studio Authoring Extensions (VSAE). This will add a VS extension and tools to develop SCOM and SCSM management packs.
(Finally…)
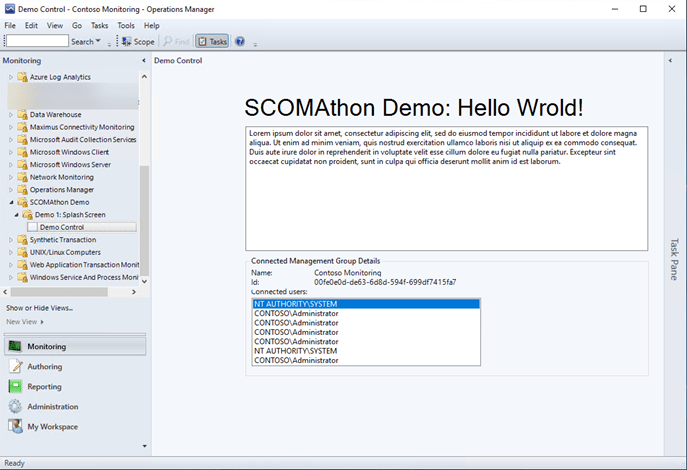
In this example, we’ll create a splash screen form saying “Hello!” to the world and add it to the SCOM Console.
Preparing projects.
First, let’s create a new project and a solution in VS. Select “Operations Manager 2012 R2 Management Pack” (or higher version). You many not see the project template in the list, so have to use the search bar to locate the template. This is because project templates installed with VSAE don’t have the newest metainformation used by VS 2019. Call the project “SCOMAthon.SplashScreenDemo”. Next, add another new project from the “Class Library (.NET Framework)”. Be careful and do not select .NET Core or .NET Standard. When prompted for .NET Framework version, I recommend to go with the latest 4.8 version. Unless you have some compatibility requirements or concerns. In this case I’d recommend to don’t go lower than 4.6.2. Call this project “SCOMAthon.SplashScreenDemo.Modules”.
NB! Always build management pack and class library in “Release” mode. So, open change default “Debug” configuration to “Release”.
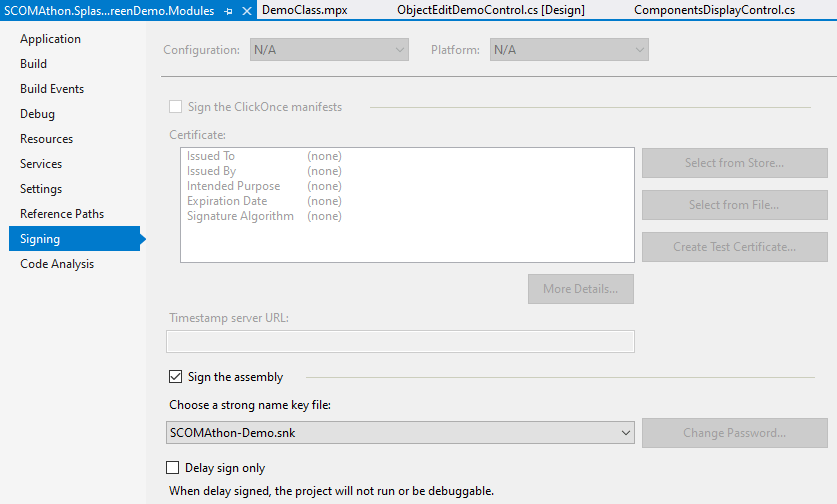
Next, create a signing key file, or reuse the demo key provided with the example. You need to sign the assembly and the management pack. You can use the same key or individual keys. Open properties of both projects and apply the key(s):

Now, you need to add references. In the class library project, add references to the following DLLs:Microsoft.EnterpriseManagement.CoreMicrosoft.EnterpriseManagement.OperationsManager
Microsoft.EnterpriseManagement.UI.Console.Common
Microsoft.EnterpriseManagement.UI.ConsoleFramework
Microsoft.EnterpriseManagement.UI.Foundation
Microsoft.EnterpriseManagement.UI.ViewFramework
Microsoft.Mom.UI.Common
You can copy these libraries from any SCOM Console installation. The Microsoft.EnterpriseManagement.Core.dll can be copied from any SDK binaries folder, which comes with any SCOM deployments.
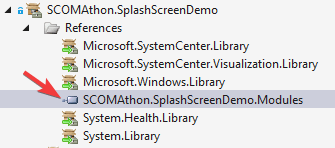
Next, in the management pack project, add a reference to the class library project:

Select the reference and open its properties (F4 or right click => Properties):
NB! Select package the class library assembly into the management pack bundle:

Preparations are finally completed, so we can start writing some code and design forms.
Creating UI Extension Control.
Select the class library project, right click it, the select Add => User Control (Windows Forms). Alternatively, while the class library project is selected, open Project from the main menu and click Add User Control (Windows Forms). Call the new control “DemoSplashScreen”. VS will create a new user control and open forms designer. Press F7 to switch to the source code and replace base class:


Now, let’s create some new methods, constructors, and overrides for existing methods. First, create a new RefreshColors() method. It’s a very simple method, but when we call it from appropriate events, it will make our new component look naturally and as a native part of SCOM Console.
protected virtual void RefreshColors()
{
  if (SystemInformation.HighContrast)
  {
    BackColor = SystemColors.Control;
  }
  else
  {
    BackColor = BrandedColors.OverviewBackgroundColor;
  }
}
Next, create override color change events to call the RefreshColors() method when it’s needed.
protected override void OnSystemColorsChanged(EventArgs e)
{
  RefreshColors();
}

protected override void OnForeColorChanged(EventArgs e)
{
  base.OnForeColorChanged(e);
  RefreshColors();
}
Now, override the existing Initialize() method to easy forms designer use and create own shared initialization method. There will be multiple constructors, therefore shared initialization code should be moved into a separate method. In this example I called it Init().
protected override void Initialize()
{
  if (DesignMode)
    return;
  base.Initialize();
}

private void Init()
{
  RefreshColors();
}
Finally, we need to create control’s constructors. And this is a moment, when I have to be honest with you. I don’t know which constructor actually will be used (ok, it’s fairly easy to investigate, but I never bothered to). I don’t know if all four constructors are required. I don’t know what is the difference. And I don’t know if some of the constructors can be omitted. This is what I called “ritual” in the beginning of this article. So, the four constructors look like this:
public DemoSplashScreen() : base(null)
{
  InitializeComponent();
  Init();
}

public DemoSplashScreen(IViewTargetParser parser) : base(parser)
{
  InitializeComponent();
  Init();
}

public DemoSplashScreen(Guid containerId, IViewTargetParser parser) : base(containerId, parser)
{
  InitializeComponent();
  Init();
}

public DemoSplashScreen(IContainer parentContainer) : base(null)
{
  ConnectToSite(parentContainer);
  InitializeComponent();
  Init();
}
Ah, almost forgot. And to set the final touch, give the component (“view” in SCOM Console terminology) a name by overriding the ViewName property (I simply used the full class name):
public override string ViewName { get { return GetType().FullName; } }
So, the component control preparations are completed and now it’s time to put some controls. This path is completely the same as development any other Windows Forms application, so I wouldn’t stop here for details, and simply show the result:
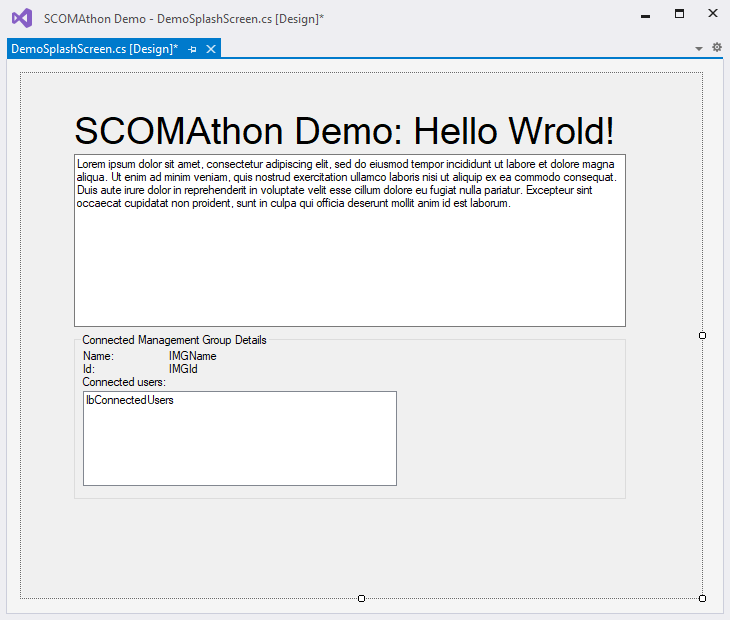
As you can see, there are some fields (two labels and a list box) to fill with data. That means, that this is the time to create the final method in our control. Actually not create, but override. I will override OnLoad(EventArgs e) method to demonstrate using of the shared SCOM management group connection.
NB! DO NOT try to use the ManagementGroup property inside a constructor. It will always be null.
protected override void OnLoad(EventArgs e)
{
  base.OnLoad(e);

  // management group connection is not available in constructor
  lMGName.Text = ManagementGroup.Name;
  lMGId.Text = ManagementGroup.Id.ToString();
  lbConnectedUsers.Items.Clear();
  foreach (string user in ManagementGroup.GetConnectedUserNames())
    lbConnectedUsers.Items.Add(user);
}
Registering UI Extension Control in SCOM Console.
When the custom user control is completed, it’s time to edit the management pack project to introduce the control to SCOM Console, give it a name and a location, etc. The very first thing we need to do is to declare an MP resource of the Assembly type.
<Resources>
  <!--
    Assembly: Console extension, including components, views, data queries, etc.
    DeployableAssembly: agent actions like probe/write action, data source, etc.
  -->
  <Assembly ID="SCOMAthon.SplashScreenDemo.Modules.Assembly" Accessibility="Internal" HasNullStream="false"
            FileName="SCOMAthon.SplashScreenDemo.Modules.dll"
            QualifiedName="SCOMAthon.SplashScreenDemo.Modules, Version=1.0.0.0, Culture=neutral, PublicKeyToken=52fc4999228d34f7"/>
</Resources>
So, this is the perfect moment to touch down on versioning and dynamic reload. In the beginning of this article, I said that assembly strong naming is a requirements for dynamic component reloading. Here is how it works.
- Each time you make modification in custom control design or code, before MP build and deployment to SCOM Management group you increase assembly version, and copy it to the MP assembly resource record.
- Deploy the updated MP to SCOM MG.
- Wait 1-2 minutes for SCOM Console to reload MG configuration.
- In SCOM Console select any other view node, rather then the updating one. Then select the custom extension view again. Repeat!
- After the second selection the custom control will be reloaded to an updated version.
- You DO NOT need to restart SCOM Console.
[assembly: AssemblyVersion("1.0.0.0")]
[assembly: AssemblyFileVersion("1.0.0.0")]
The above code block is from AssemblyInfo.cs file from the class library project. Every time modifying the control, increase the both assembly and assembly file versions. Then copy the new number to the QualifiedName parameter.
Hint: You can use tools like JetBrains dotPeek to see assembly property and copy qualified name.
When an interface assembly is registers as a MP resource, we need to create the following elements:
- Category — to indicate assembly type (Windows Assembly in this example).
- View Type — to define view configuration (oh, that’s another complex topic), and view implementation, i.e. assembly file and a class type in this assembly (single assembly can have multiple view (User Control) implementations.
- View — to make an actual view from a view type and to associate it with particular target SCOM Class (again, it’s yet another complex topic).
- Folder Item — to “publish” a view in a folder.
- (Optional) Folder — this may already exist in your MP.
- Language Pack — to give names to all the elements.
This is the whole code block with all the required elements as listed above:
<Categories>
  <Category ID="SCOMAthon.SplashScreenDemo.DemoControl.Catrgoty" Target="SCOMAthon.SplashScreenDemo.Modules.Assembly"
            Value="Visualization!Microsoft.SystemCenter.Visualization.WindowsAssembly" />
</Categories>
<PresentationTypes>
  <ViewTypes>
    <ViewType ID="SCOMAthon.SplashScreenDemo.DemoControl.ViewType" Accessibility="Public">
      <Configuration />
      <ViewImplementation>
        <Assembly>SCOMAthon.SplashScreenDemo.Modules.Assembly</Assembly>
        <!-- Full implementing type name -->
        <Type>SCOMAthon.SplashScreenDemo.Modules.DemoSplashScreen</Type>
      </ViewImplementation>
    </ViewType>
  </ViewTypes>
</PresentationTypes>
<Presentation>
  <Views>
    <View ID="SCOMAthon.SplashScreenDemo.DemoControl.View" Accessibility="Public" Enabled="true" Visible="true"
          TypeID="SCOMAthon.SplashScreenDemo.DemoControl.ViewType" Target="System!System.Entity">
      <!-- Category is compulsory and must be one of the predefined values -->
      <Category>Monitoring</Category>
    </View>
  </Views>
  <Folders>
    <Folder ID="SCOMAthon.SplashScreenDemo.Root.Folder" ParentFolder="SC!Microsoft.SystemCenter.Monitoring.ViewFolder.Root" Accessibility="Public" />
    <Folder ID="SCOMAthon.SplashScreenDemo.DemoControl.Folder" ParentFolder="SCOMAthon.SplashScreenDemo.Root.Folder" Accessibility="Public"/>
  </Folders>
  <FolderItems>
    <FolderItem ID="SCOMAthon.SplashScreenDemo.DemoControl.FolderItem" ElementID="SCOMAthon.SplashScreenDemo.DemoControl.View"
                Folder="SCOMAthon.SplashScreenDemo.DemoControl.Folder" />
  </FolderItems>
</Presentation>
<LanguagePacks>
  <LanguagePack ID="ENU" IsDefault="true">
    <DisplayStrings>
      <DisplayString ElementID="SCOMAthon.SplashScreenDemo.Root.Folder">
        <Name>SCOMAthon Demo</Name>
      </DisplayString>
      <DisplayString ElementID="SCOMAthon.SplashScreenDemo.DemoControl.Folder">
        <Name>Demo 1: Splash Screen</Name>
      </DisplayString>
      <DisplayString ElementID="SCOMAthon.SplashScreenDemo.DemoControl.View">
        <Name>Demo Control</Name>
      </DisplayString>
    </DisplayStrings>
  </LanguagePack>
</LanguagePacks>
As a final touch, I also created another Language Pack element for the MP itself. So, it’s time to compile and deploy. The result should look like the following screenshot from my test lab.
Troubleshooting.
This is a time to wrap up the first part before going for more advanced examples. But I bet you would like to experiment with this base example and try to develop it further. Therefore, I’m going to give some troubleshooting tips. What if thing went wrong and your extension causes SCOM Console crash?! Don’t worry. Try to follow these steps:
- First, either remove the management pack with the faulty extension, or import an updated version of the MP with either fixed version of the extension or previous version of the extension (you cannot downgrade MP, but you can rollback class library code, then increase library version).
- Use PoweShell to import or delete the MP.
- Clear console cache at “%USERPROFILE%\AppData\Local\Microsoft\Microsoft.EnterpriseManagement.Monitoring.Console”.
- Clear type cache at “%USERPROFILE%\AppData\Local\Microsoft\ System Center Service Manager 2010”
- Start SCOM Console again.
SCOM Console has the entity cache – where it stores SCOM objects (class instances) to display in different views. The entity cache is well documented, and this is the only cache normally referred in the context of SCOM Console. In fact, it’s not necessary to clear the entity cache when you update the faulty MP/library, but might be useful when you delete the MP. The main cache to clear, although, is the type cache. It’s where SCOM (and SCSM) consoles keep all component implementation. The console application doesn’t download all component implementation assemblies individually, but put them into a single .bin file and keep assembly set hash in a separate file. When the hash changes, it reloads all assemblies from the management group. This cache is located in “%USERPROFILE%\AppData\Local\Microsoft\System Center Service Manager 2010”

I went through this and successfully built and imported into SCOM. When I select the SCOM demo control I get an error. Could not load assembly ‘Scomathon.SplashScreenDemoModule’. This exists in the resource table. What am I missing to get this assembly into SCOM?
Yes, I know it is singular module not modules. I verified code changes from modules to module.
LikeLike
Thank you so much for this! I’ve been looking forever for a good tutorial on doing custom UIs in SCOM and this is finally what I was looking for.
While I can get provided demo to work, when I build my own solution I continue to get console error saying unable to load assembly, cannot find dll. The solution builds and imports just fine and I can see the type cache being updated when the MP loads. Some design stuff aside my solution appears to be the same as your demo.
Any suggestions on where I should look to start resolving this issue? Thanks!
LikeLike
Hi Will.
Thank you for your interest. And sorry about the late response, I’ve been a bit busy last time.
It’s hard to answer your question without seeing your solution, so I’ll just list all of possibilities to check, thus sorry if some of them are too obvious or you have already checked.
1. Ensure that the UI assembly is included as ‘Assembly’ resource, NOT as ‘DeployableAssembly’.
2. I strongly recommend to sign the assembly. After you sign it, version update will be much easier.
3. (I usually set both file version and assembly version to the same value to avoid confusion).
4. When you signed and versioned you UI assembly, load it in a tool like JetBrians dotPeek and get fully qualified assembly name copied to your MP XML:
5. Dependencies!!!!
5.1. The error message you get doesn’t necessarily mean that your assembly is not found. That may refer that its dependency is not found.
5.2. For any dependency not in .NET Framework, you must explicitly add it to your MP as another assembly and then also explicitly specify it as dependency like:
LikeLike
Thanks Max! I had figured it out but these tips really helped with some other things I was struggling with. Any tips on extending the console in the Authoring space?
LikeLike